Prisma DI-5
INSTRUMENT USER MANUAL
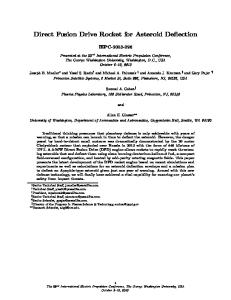
INSTRUMENT OVERVIEW Display Push Buttons
LED Indicators for Range Limits
Battery Charge Port Transducer Port
Transducer Tip
Locking Ring
Measuring Tip Extension Bar 10 mm Extension Bar 20 mm Extension Bar 40 mm Extension Bar 80 mm
Fine Adjustment Thread
Extension Bar 160 mm
SPARE PART LIST ITEM NO 412-2005 412-2214 412-2642 412-2643 412-2793 412-2794 412-2893 412-2897 412-2899 423-3005 423-3637 423-3640 434-4005 434-4758
DESCRIPTION Transducer Standard, min 89 mm including measuring tip 10 mm Transducer Tip, Standard Adjusting sleeve, 10 mm Adjusting sleeve, Standard, 12 mm Locking Ring, 10 mm Locking Ring, Standard, 12 mm Cable 7p/5p DIN, 3,6 meter Cable 7p/5p DIN, 7 meter Magnet to be Attached to cable Transducer Small, min 60 mm, Including measuring tip 7 mm Adjusting sleeve, small 10 mm Locking Ring, Small, 10 mm Transducer W, min 100 mm, Including measuring tip 10 mm Transducer Tip, 17 mm
ITEM NO DESCRIPTION 458-5000 Extension Bar Set: 2x160 mm, 1x80, 40, 20, 10 mm, 10 mm measuring tip 458-5107 Extension Bar, 10 mm 458-5160 Extension Bar, 160 mm 458-5205 Extension Bar, 20 mm 458-5402 Extension Bar, 40 mm 458-5809 Extension Bar, 80 mm 458-6000 Spare Tips Set: Transducer Tip Standard & 17 mm, Measuring Tip Standard & 14 mm 458-6074 Measuring Tip, small, 7 mm 458-6106 Measuring Tip, Standard, 10 mm 458-6123 Measuring Tip, 14 mm 501-1990 Battery Li-Ion, with connector 501-1992 Charger for Li-Ion battery 12-2903-A Prisma DI Plastic Case, Black 300x265x140 mm
HOW TO USE THE INSTRUMENT 1. Ensure that the cable is properly connected. 2. Select the applicable extension bar(s). Don´t fit the transducer yet. 3.
Push POWER button and hold shortly. Check the battery level when battery symbol show up. If battery level is low charge the battery with the enclosed charger. Follow the Charger manual. Note! Use only the charger delivered with instrument.
4. Push LIGHT button if needed. The backlight LEDs will light for 15 sec after every button push. 5.
Push RESET button
6.
Fit the transducer between the webs in the punch marks. Adjust the screw ring to a reading close to zero and lock it with the locking ring.
7.
Push ZERO button.
8.
Rotate crankshaft and check deflection by normal procedure.
9.
Note the results, and keep them to compare with the next measurements.
10. Remove the transducer by pressing it to one side. Note! It is normally unnecessary to unlock the adjuster. 11. Fit the transducer into the next crank web position. 12. Repeat the procedure from step 6.
NOTE 1
If the DI-5C is not used for a long time, then it´s necessary to charge the battery at least once a year.
NOTE 2
Don’t use the charger as a power supply. It’s only for charging the Li-Ion battery.
• Made In Sweden • Easy To Use • Accuracy: 1/1000 mm • Trickle Charge • Option: Ovality Kit • Transfer to Windows-PC
© PRISMATIBRO.SE • 1610
Prisma DI-5C
Prisma DI Ovality Kit
ITEM NO 488-8100 Cylinder liner maintenance. The Ovality Kit is an accessory to the Prisma DI-5C and Prisma DI-5. The method is simply giving 5 measuring points at each level of the liner. To compare the levels you will also see how much the wear of the liner is in the cylinder top. Using the Prisma DI Ovality Kit together with Prisma DI-5C and kit you do have an outstanding funktion to load all your measurements into the PC software and print out graphs to see the wear and how it develops over time.
Prisma DI-5
• Made In Sweden • Easy To Use • Accuracy: 1/1000 mm • Trickle Charge • Option: Ovality Kit
POSTAL P. O. Box 7, SE-543 21 Tibro VISIT Mariestadsvægen 28, SE-543 30 Tibro GPS Lat N 58° 25´ 55” Lon E 14° 9´ 46” SWITCHBOARD +46 504 400 40 FAX +46 504 141 41 WEB www.prismatibro.se E-MAIL
[email protected]